How to setup Endpoint Privilege Management with Microsoft Intune. Microsoft Intune Endpoint Privilege Management (EPM) allows your organization’s users to run as a standard user (without administrator rights) and complete tasks that require elevated privileges. Tasks that commonly require administrative privileges are application installs (like Microsoft 365 Applications), updating device drivers, and running certain Windows diagnostics.
Table of Contents
What are we going to setup
In this blog post we will guide you through the setup on How to setup Endpoint Privilege Management with Microsoft Intune. We will show you the setup in the following structure.
- Step 1: Check Licensing
- Step 2: Deploy an elevation settings policy
- Step 3: Deploy elevation rule policies
Step 1: Check Licensing
Endpoint Privilege Management requires an additional license beyond the Microsoft Intune Plan 1 license. You can choose between an stand-alone license that adds only EPM, or license EPM as part of the Microsoft Intune Suite. For more information, see Use Intune Suite add-on capabilities.
Step 2: Deploy an elevation settings policy
The first step in setting up Endpoint Privilege Management is to deploy an elevation settings policy. This policy defines the default behavior for elevation prompts on managed endpoints. To do this:
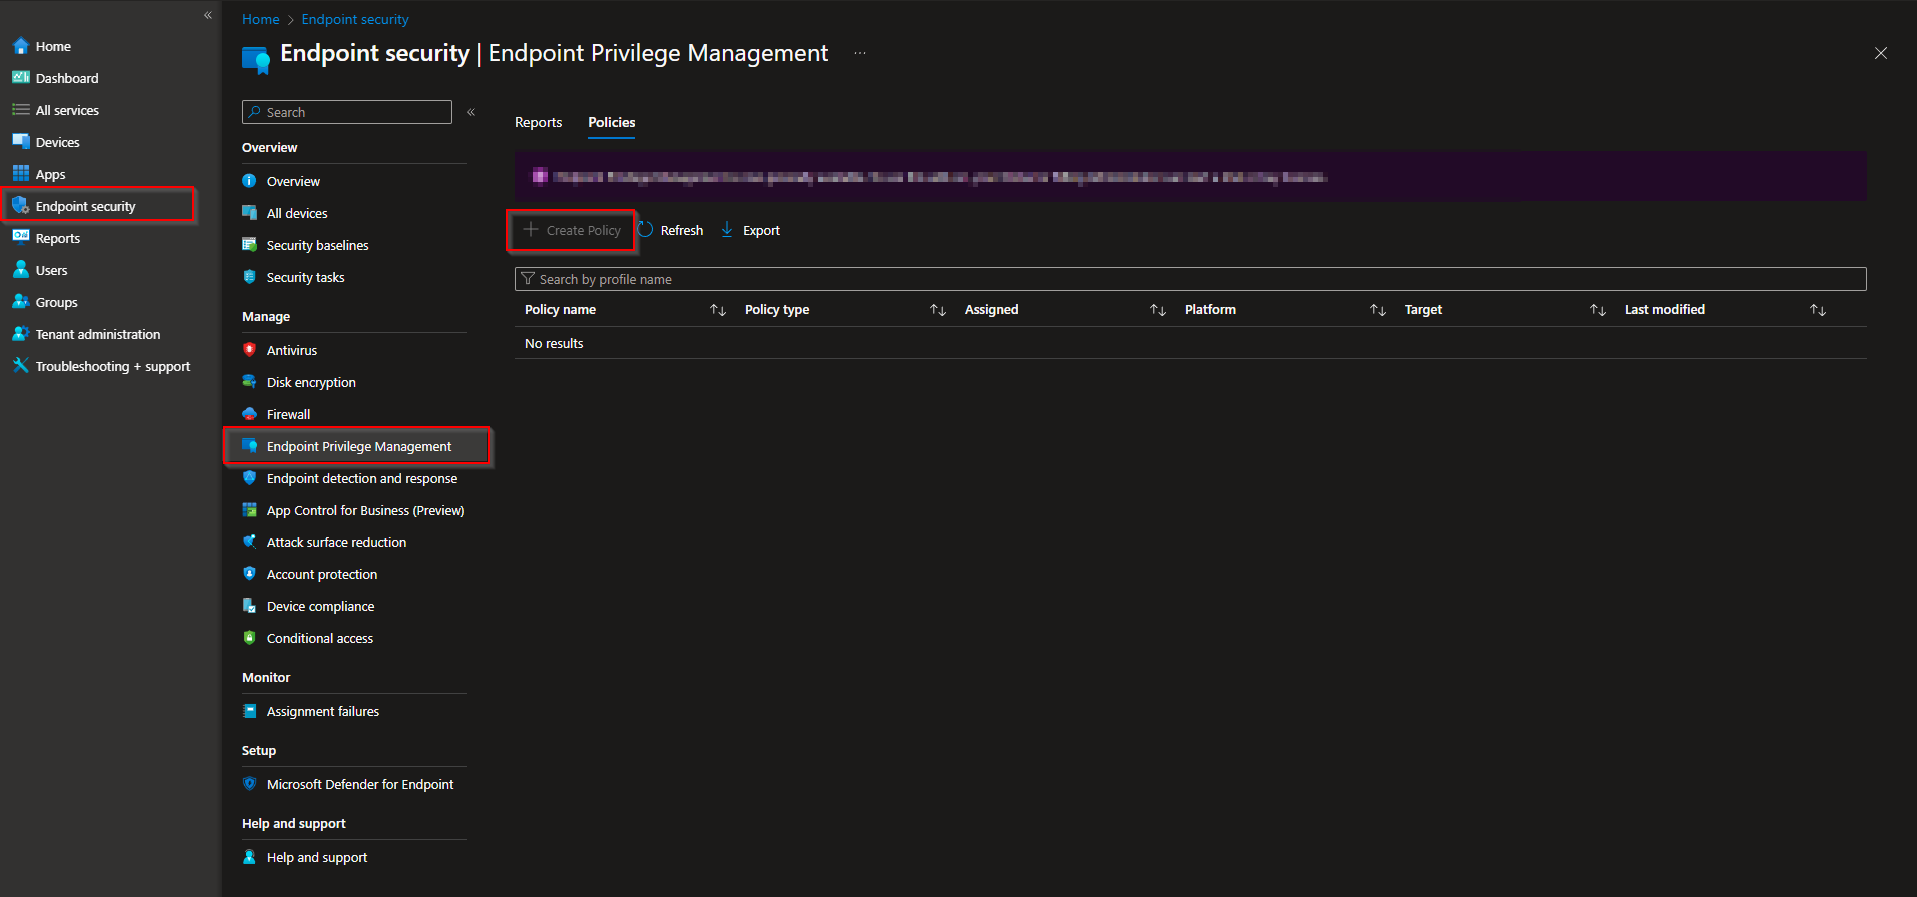
- Log in to the Microsoft Intune admin center.
- Navigate to “Endpoint security” > “Endpoint privilege management” > “Policies“
- Click on “Create policy“.
On Basics, enter the following properties:
- Name: Enter a descriptive name for the profile. Name profiles so you can easily identify them later.
- Description: Enter a description for the profile. This setting is optional but recommended.
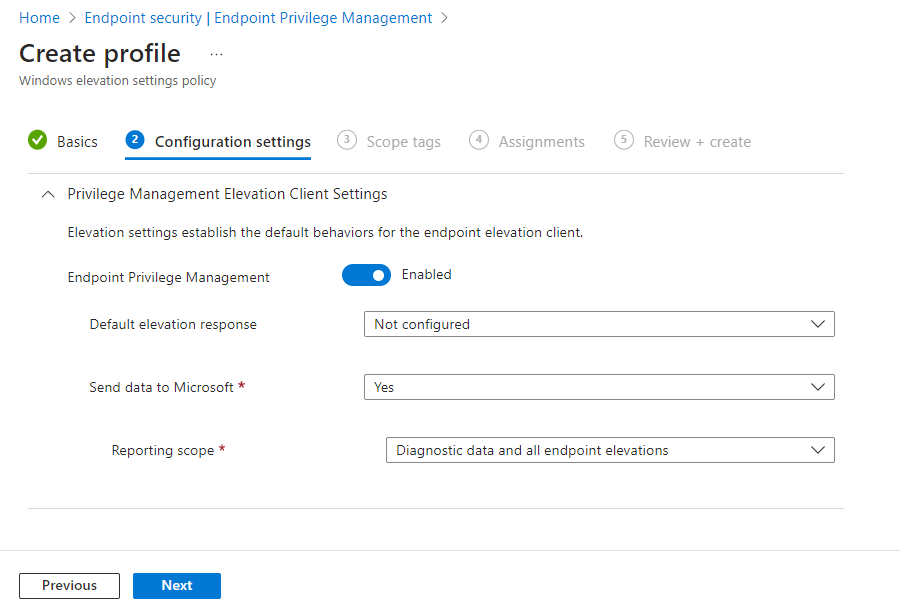
On Configuration settings, configure the following to define default behaviors for elevation requests on a device:
- Endpoint Privilege Management: Set to Enabled (default). When Enabled, a device uses Endpoint Privilege Management. When set to Disabled, the device doesn’t use Endpoint Privilege Management, and immediately disables EPM if it was previously enabled. After seven days, the device will deprovision the components for Endpoint Privilege Management.
- Default elevation response: Configure how this device manages elevation requests for files that aren’t directly managed by a rule:
- Not Configured: This option functions the same as Deny all requests.
- Deny all requests: EPM doesn’t facilitate the elevation of files and the user is shown a pop-up window with information about the denial. This configuration doesn’t prevent users with administrative permissions from using Run as administrator to run unmanaged files.
- Require user confirmation: This behavior applies to elevation requests for files that aren’t managed by an elevation rule policy. The user receives a simple prompt to confirm their intent to run the file. You can also require more prompts that are available from the Validation drop down:
- Business justification: Require the user to enter a justification for running the file. There’s no required format for this justification. User input is saved and can be reviewed through logs if the Reporting scope includes collection of endpoint elevations.
- Windows authentication: This option requires the user to authenticate using their organization credentials.
- Send elevation data for reporting: By default, this behavior is set to Yes. When set to yes, you can then configure a Reporting scope. When set to No, a device doesn’t report diagnostic data or information about file elevations to Intune.
- Reporting scope: Choose what type of information a device reports to Intune:
- Diagnostic data and all endpoint elevations (Default): The device reports diagnostic data and details about all file elevations that are facilitated by EPM.This level of information can help you identify additional files that aren’t yet managed by an elevation rule that users seek to run in an elevated context.
- Diagnostic data and managed elevations only: The device reports diagnostic data and details about file elevations for only those files that are managed by an elevation rule policy. File requests for unmanaged files, and files that are elevated through the Windows default action of Run as administrator, aren’t reported as managed elevations.
- Diagnostic data only: Only diagnostic data for the operation of Endpoint Privilege Management is collected. Information about file elevations isn’t reported to Intune.
On the Scope tags page, select any desired scope tags to apply, then select Next. For Assignments, select the groups that receive the policy and click on Next.
For Review + create, review your settings and then select Create. When you select Create, your changes are saved, and the profile is assigned. The policy is also shown in the policy list.
Step 3: Deploy elevation rule policies
Deploy a Windows elevation rules policy to users or devices to deploy one or more rules for files that are managed for elevation by Endpoint Privilege Management. Each rule you add to this policy:
- Identifies a file for which you want to manage elevation requests.
- Can include a certificate to help validate that file’s integrity before it’s run. You can also add a reusable group that contains a certificate that you then use with one or more rules or policies.
- Specifies if the elevation type of the file as automatic (silently) or requiring user confirmation. With user confirmation, you can add additional user actions that must be completed before the file is run. In addition to this policy, a device must also be assigned a Windows elevation settings policy that enables Endpoint Privilege Management.
To configure Elevation Rule Policies just follow the steps below:
- Sign in to the Microsoft Intune admin center and go to Endpoint security > Endpoint Privilege Management > select the Policies tab > and then select Create Policy. Set the Platform to Windows 10 and later, Profile to Windows elevation rules policy, and then select Create.
On Basics, enter the following properties:
- Name: Enter a descriptive name for the profile. Name profiles so you can easily identify them later.
- Description: Enter a description for the profile. This setting is optional but recommended.
On Configuration settings, add a rule for each file that this policy manages. When you create a new policy, the policy starts includes a blank rule with an elevation type of User confirmed and no rule name. Start by configuring this rule, and later you can select Add to add more rules to this policy. Each new rule you add has an elevation type of User confirmed, which can be changed when you configure the rule. To configure a rule, select Edit instance to open its Rule properties page, and then configure the following

- Rule name: Like a policy name, enter a descriptive name for the rule. Name your rules so you can easily identify them later.
- Description (Optional): Enter a description for the profile.
Elevation conditions are conditions that define how a file runs, and user validations that must be met before the file this rule applies to can be run.
- User confirmed: We recommend this option for most rules. When a file is run, the user receives a simple prompt to confirm their intent to run the file. The rule can also include additional prompts that are available from the Validation drop down:
-
-
- Business justification: Require the user to enter a justification for running the file. There’s no required format for the entry, however the user input is saved and can be reviewed through logs if the Reporting scope includes collection of endpoint elevations.
- Windows authentication: This option requires the user to authenticate using their organization credentials.
-
- Automatic: This elevation type automatically runs the file in question with elevated permissions. Automatic elevation is transparent to the user, without prompting for confirmation or requiring justification or authentication by the user.Elevation type: By default, this option is set to User confirmed, which is the elevation type we recommend for most files.
- Child process behavior: By default, this option is set to Require rule to elevate, which requires the child process to match the same rule as process that creates it. Other options include:
- Allow all child processes to run elevated: This option should be used with caution as it allows applications to create child processes unconditionally.
- Deny all: This configuration prevents any child process from being created.
File information is where you specify the details that identify a file that this rule applies to.
- File name: Specify the file name and its extension. For example:
myapplication.exe - File path (Optional): Specify the location of the file. If the file can be run from any location or is unknown, you can leave this blank. You can also use a variable.
- Signature source: Choose one of the following options:
- Use a certificate file in reusable settings (Default): This option uses a certificate file that has been added to a reusable settings group for Endpoint Privilege Management. You must create a reusable settings group before you can use this option.To identify the Certificate, select Add or remove a certificate, and then select the reusable group that contains the correct certificate. Then, specify the Certificate type of Publisher or Certificate authority.
- Upload a certificate file: Add a certificate file directly to the elevation rule. For File upload, specify a .cer file that can validate the integrity of the file that this rule applies to. Then, specify the Certificate type of Publisher or Certificate authority.
- Not configured: Use this option when you don’t want to use a certificate to validate the integrity of the file. When no certificate is used, you must provide a file hash.
- File hash: The file hash is required when Signature source is set to Not configured, and optional when set to use a certificate.
- Minimum version: (Optional) Use x.x.x.x format to specify a minimum version of the file that is supported by this rule.
- File description: (Optional) Provide a description of the file.
- Product name: (Optional) Specify the name of the product that the file is from.
- Internal name: (Optional) Specify the internal name of the file.

Select Save to save the rule configuration. You can then Add additional rules, and when you’ve added all the rules this policy will include, select Next to continue.
On the Scope tags page, select any desired scope tags to apply, then select Next.
For Assignments, select the groups that receive the policy. For more information on assigning profiles, see Assign user and device profiles. Select Next.
In Review + create, review your settings and then select Create. When you select Create, your changes are saved, and the profile is assigned. The policy is also shown in the policy list.
Conclusion
You learned How to setup Endpoint Privilege Management with Microsoft Intune. We have shown you the comprehensive guide on how to setup Endpoint Privilege Management with Microsoft Intune. Did you enjoy this article? Dont forget to follow us and share this article. You may also like the the following articles.


