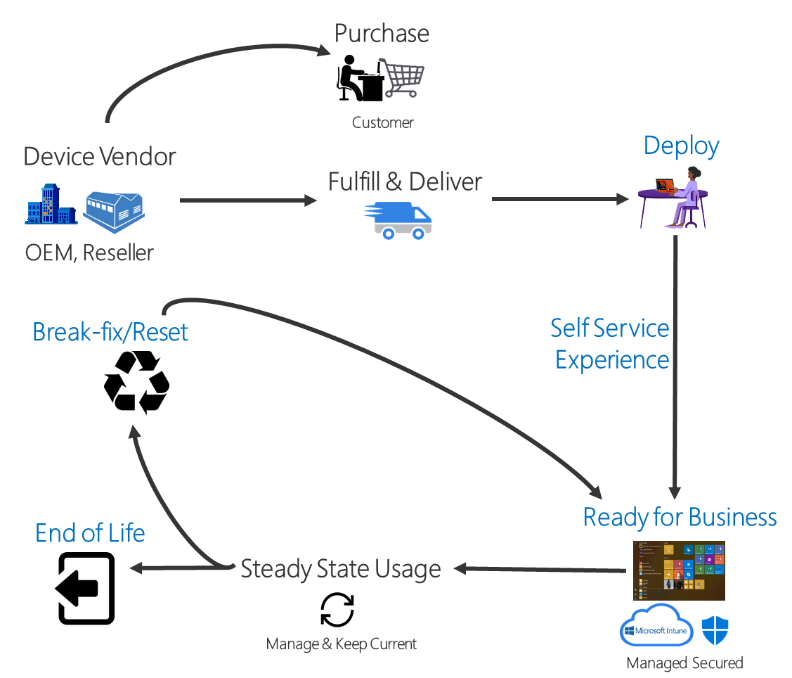
Welcome to the Step-by-Step Microsoft Intune Autopilot Setup Guide [2024]. Windows Autopilot is a collection of technologies that allows you to set up and pre-configure new Windows devices, getting them ready for productive use. You can also use Windows Autopilot to reset, repurpose, and recover devices. This solution enables an IT department to achieve the above with little to no infrastructure to manage, with a process that’s easy and simple.
In this blog post, I will cover the basics of Windows Autopilot, the prerequisites for using it, and a step-by-step guide on how to set up and configure Windows Autopilot in Microsoft Intune. You can use this guide to get started with Windows Autopilot deployment in your organization.
Table of Contents
What is Microsoft Intune Autopilot and what are the Advantages
Microsoft Intune Autopilot is a feature of Microsoft Intune that allows you to set up and configure new Windows devices without re-imaging them. You can use Autopilot to customize the out-of-box experience (OOBE) for the end users and apply device-specific settings and policies using Intune. Some of the advantages of using Autopilot are:
- It reduces the time and effort required by IT to deploy, manage, and retire devices.
- It uses the preinstalled Windows 10 version that is optimized for the device model, so you don’t have to maintain custom images and drivers.
- It enables the end users to get their devices ready for use with a few simple steps and sign in with their Azure Active Directory (AAD) credentials.
- It integrates with other Microsoft services and apps, such as Windows Update for Business, Microsoft 365, and Configuration Manager1
Microsoft Intune Windows Autopilot Setup Process Overview
Windows Autopilot is a process that allows you to customize and configure Windows OS on laptops without re-imaging them. In many organizations, IT spends a lot of time deploying operating system, updates, branding, and other features on new or existing devices. Windows Autopilot simplifies this task by using the preinstalled Windows 10 version that is optimized for the device model. You can use Windows Autopilot to transform your Windows 10 installation into a ready-to-use state that can:
- Apply settings and policies.
- Install Company Applications.
- Change the edition of Windows 10 (for example, from Windows 10 Pro to Windows 10 Enterprise) to support advanced features.
Once the device is configured, you can manage it with Intune, Configuration Manager, or other tools. Therefore, Windows Autopilot is a solution that lets you modify the existing Windows OS instead of deploying a new one.
Prerequisites
- Intune subscription: You need to have a Microsoft Intune subscription to manage your devices and apply policies and settings.
- Windows automatic enrollment: You need to enable Windows automatic enrollment in Azure Active Directory (AAD) to automatically enroll your devices into Intune. You can follow the steps here3 to configure it.
- Required permissions: You need to have the appropriate permissions to enroll and manage devices in Intune and AAD. You can use the built-in Intune Administrator or Policy and Profile Manager roles, or create a custom Autopilot device manager role using role-based access control (RBAC). You can learn more about the required permissions here.
Configure Microsoft Intune Autopilot
In this section we will show you, how to configure the settings for Microsoft Intune Windows Autopilot. We will configure the following:
- Step 1: Collect the hardware hash
Here we will take a look on how to collect the hardware hash from the device which we need to upload in step 2. - Step 2: Register devices as Autopilot devices
In this step we are going to register the devices with the help of the exported device information from step 1. - Step 3: Configure Autopilot Enrollment Status Page (ESP)
In this step we are going to setup the Enrollment Status Page which will be visible in the setup process. - Step 4: Create and assign Autopilot profile
Here we are going to create the Autopilot profile.
In the end we are going to have a look on how the user enrollment process of a new device will be with Autopilot with a step-by-step documentation.
Step 1: Collect the hardware hash
The hardware hash is a unique identifier of the device that is used to register it with Windows Autopilot. You can collect the hardware hash from existing Windows devices using different methods, such as Microsoft Configuration Manager, Windows PowerShell, OOBE diagnostics page, or Settings app. You can find the detailed instructions for each method here.
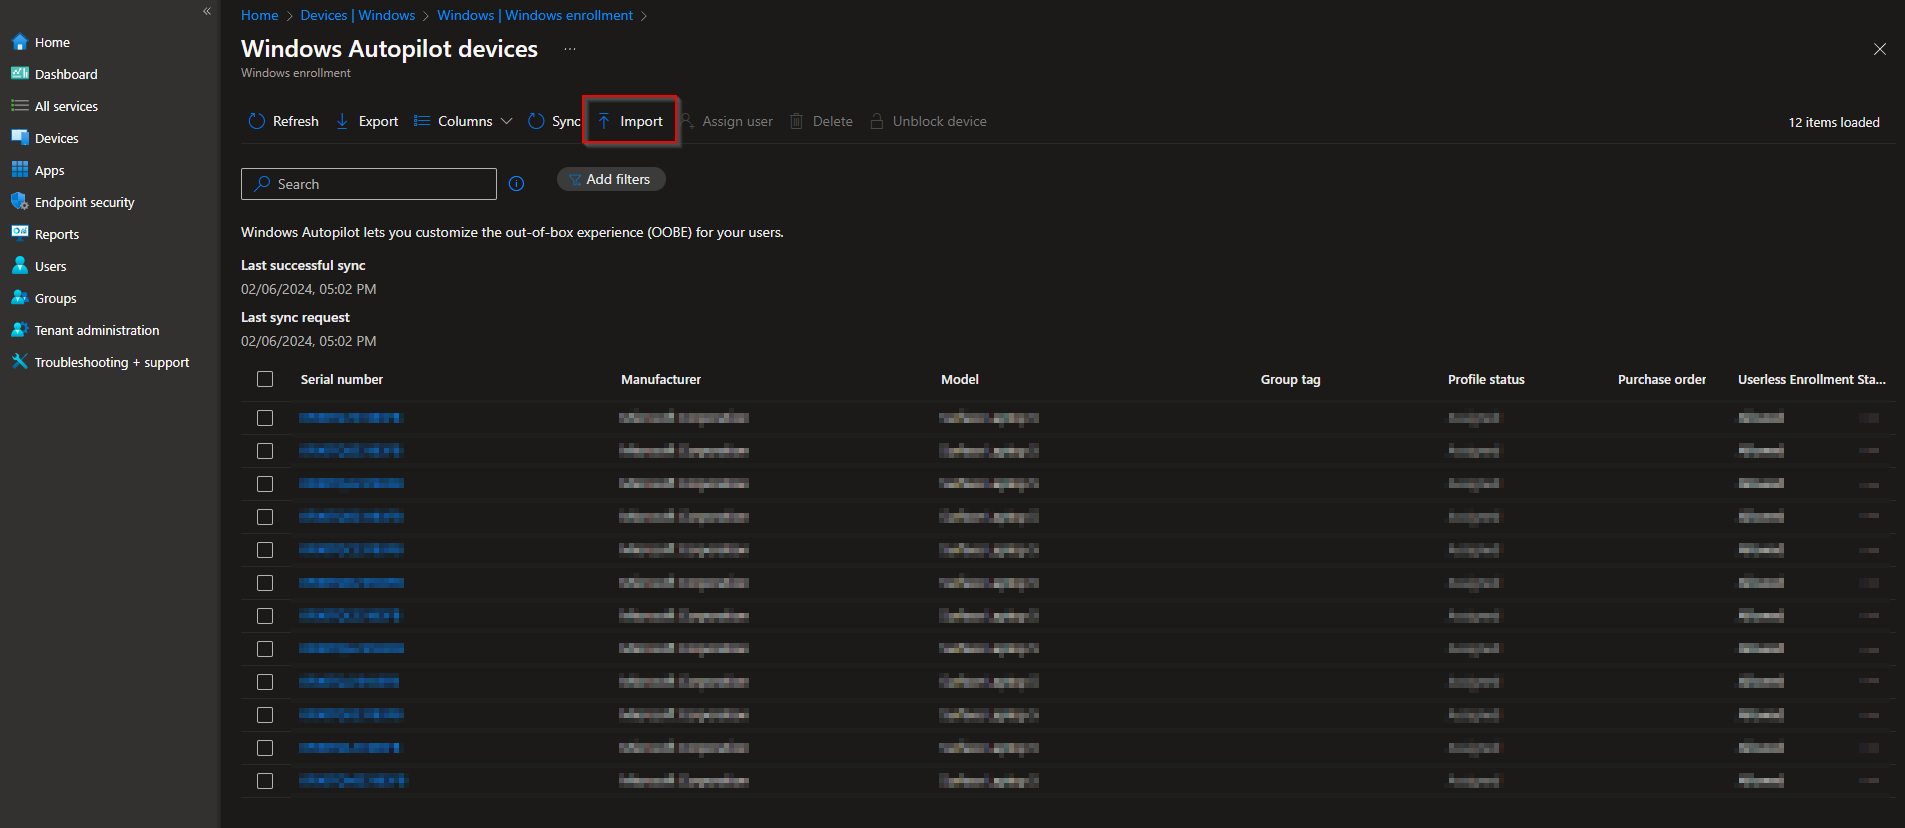
Step 2: Register devices as Autopilot devices
Once you have the hardware hash of the devices, you can register them as Autopilot devices in Intune. You can do this manually by uploading a CSV file with the hardware hashes, or automatically by using the Windows Autopilot Deployment Service. You can also transfer device hashes from one tenant to another tenant if needed.
To upload the CSV file go to intune.microsoft.com and click on Devices > Windows > Windows enrollment > Devices. There click on Import and upload your CSV file. Now your Device should be visible in the list below. If you are going to setup the device soon, dont forgett to manually trigger the sync next to the Import button. This makes sure that the device will be correctly assigned to this tenant.
Step 3: Configure Autopilot Enrollment Status Page (ESP)
The ESP is a page that shows the progress of the device configuration during the OOBE. You can customize the ESP settings and behavior using Intune, such as hiding or showing specific steps, setting timeout values, blocking or allowing access to the desktop, and so on. You can also assign the ESP to a device group to apply the settings to all the devices in the group. The ESP tab will look like this when configured:
You dont really need to setup an Enrollment Status Page (ESP) but it might help users to understand what the device is doing at the moment. To configure the ESP page go to intune.microsoft.com and click on Devices > Windows > Windows Enrollment > Enrollment Status Page. On this page create a new Enrollment Status Page.

Give it a meaningful name and click on Next. I will call mine Windows Autopilot. In the Settings tab you can find all the settings you can configure. I usually leave it as it is but if you want to learn more about all the settings check out my Blog Post about all the Enrollment Status Page functions.
Step 4: Create and assign Autopilot profile
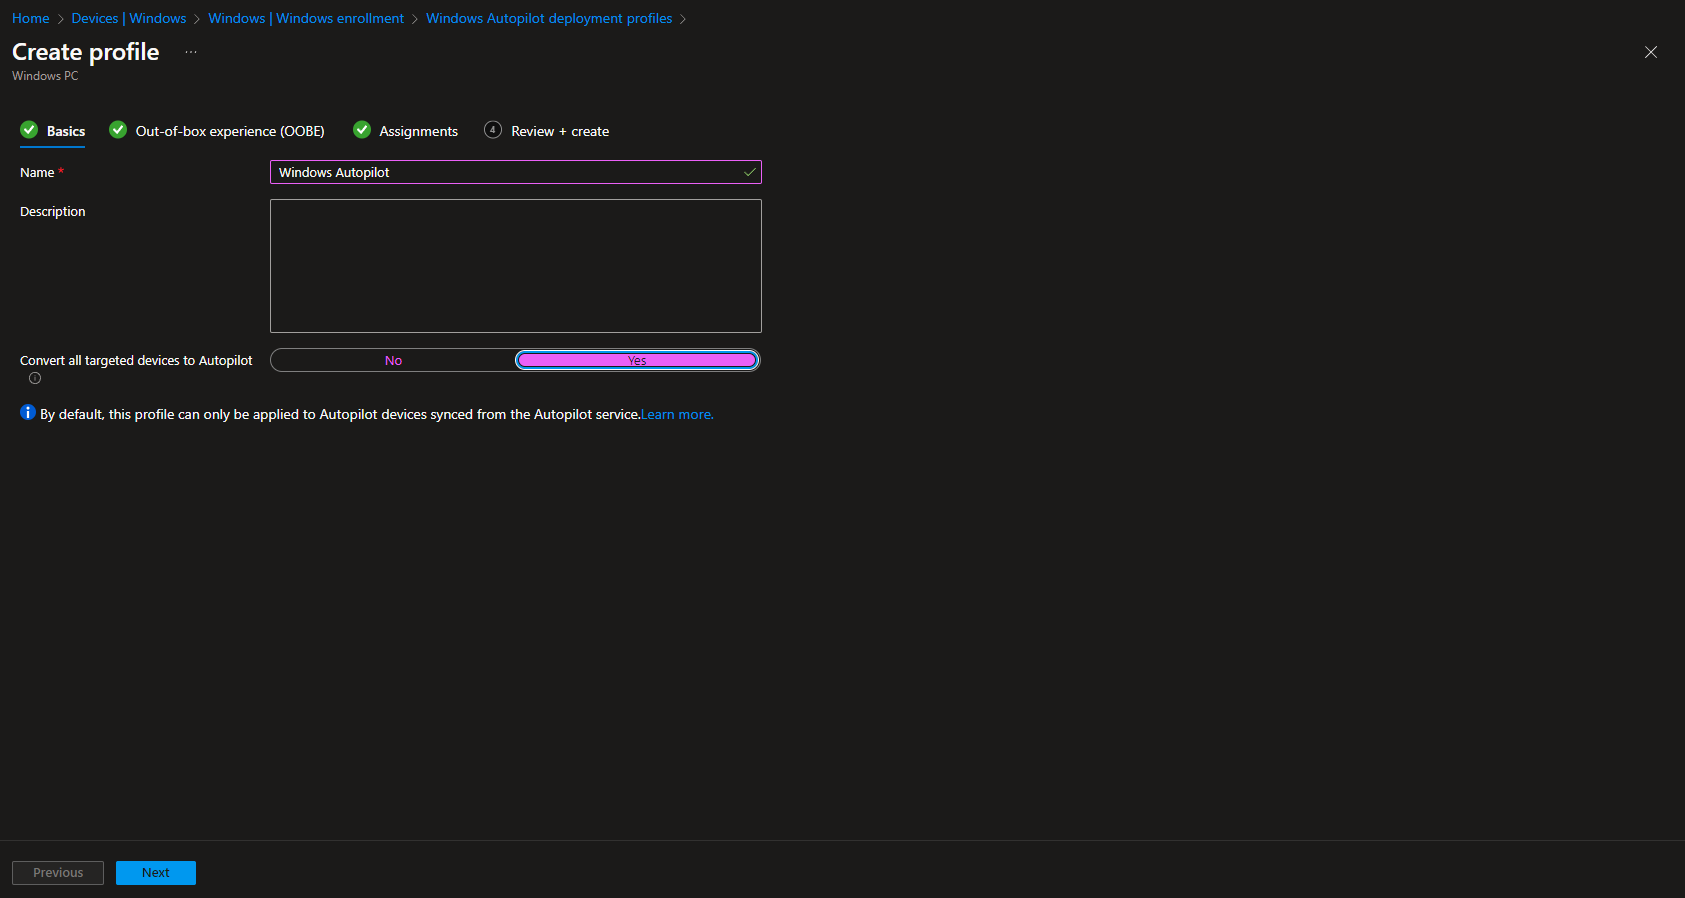
The Autopilot profile is a set of settings that defines the OOBE experience for the end users and the device mode. You can create different profiles for different scenarios and assign them to device groups. You can also edit or delete the profiles as needed. Let’s create a new Windows Autopilot deployment profile.
To create a new profile go to intune.microsoft.com and click on Devices > Windows > Windows enrollment > Deployment profiles. There click on Create profile. On the Create profile page, specify the name for the Autopilot profile. Let’s also convert all targeted devices to Autopilot. Click Next.
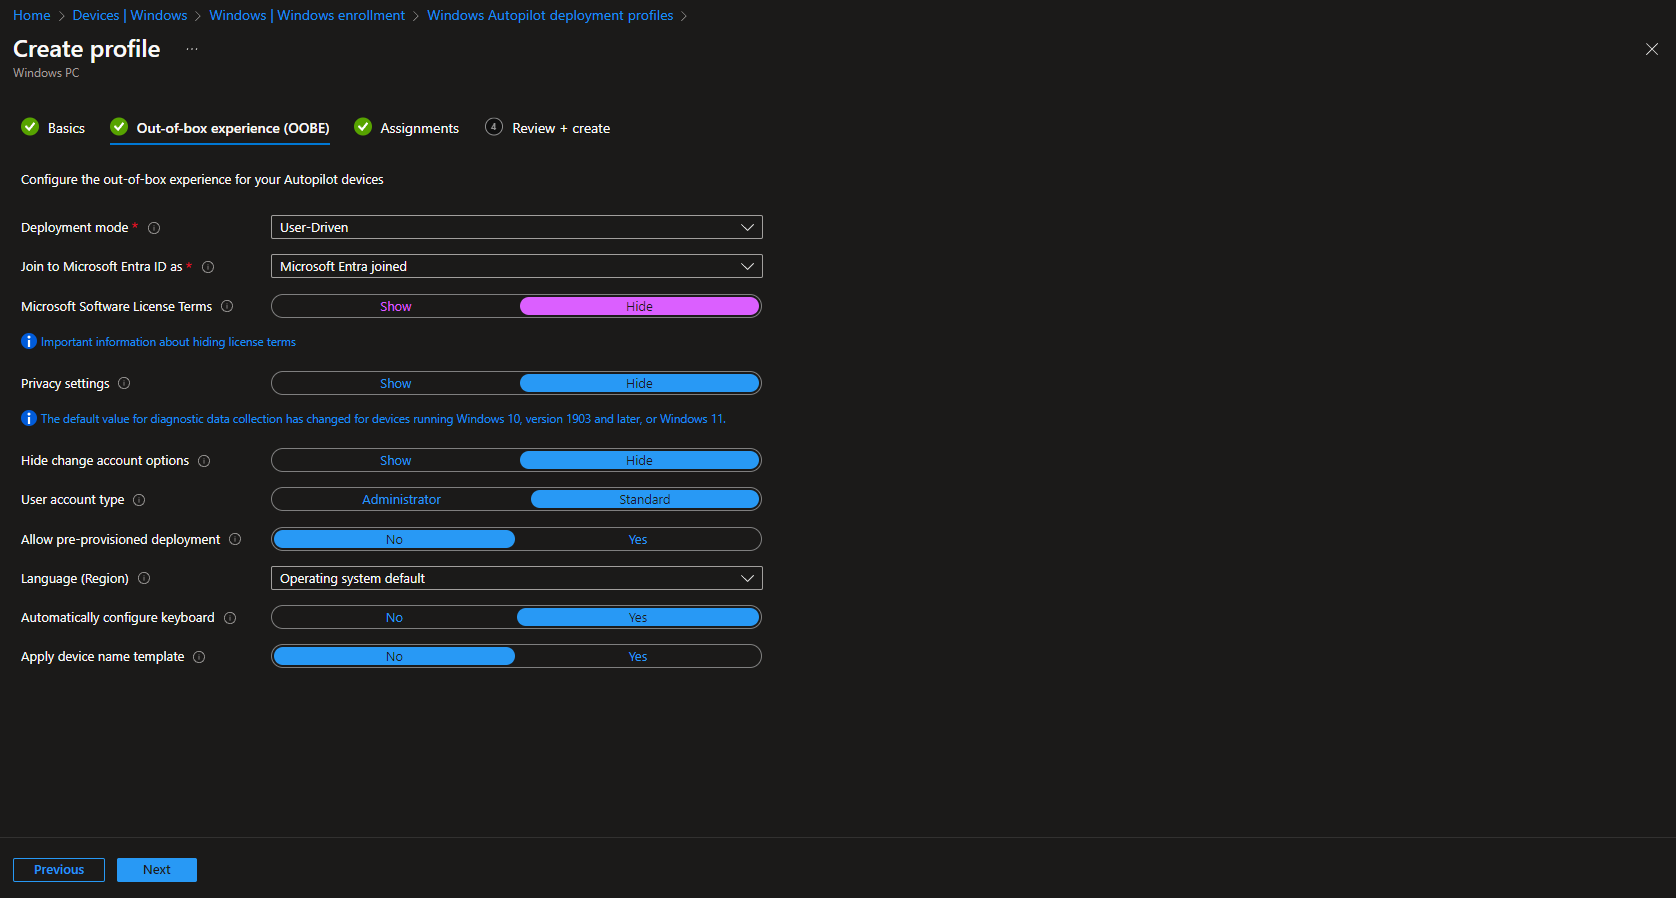
On the Out of box experience (OOBE) page there are lot of settings that you can specify. To keep it simple I am not going to change any values here and go with following default values.
- Deployment Mode – User Driven
- Join to Azure AD as – Azure AD joined
- Microsoft Software License Terms – Hide
- Privacy Settings – Hide
- Hide change account options – Hide
- User Account type – Standard
- Allow White Glove OOBE – No
- Language (Region) – Operating System default
- Automatically Configure keyboard – Yes
- Apply device name template – Yes
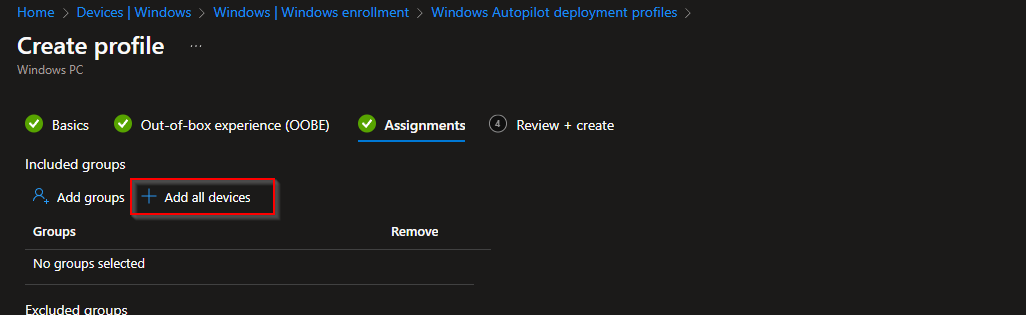
On the Assignments page, add all Devices and click on Next.
On the Review + create tab Create the Autopilot profile. You have now created an Autopilot profile which will be automatically applied to the devices imported into the Intune Portal.
Windows Autopilot Setup Process
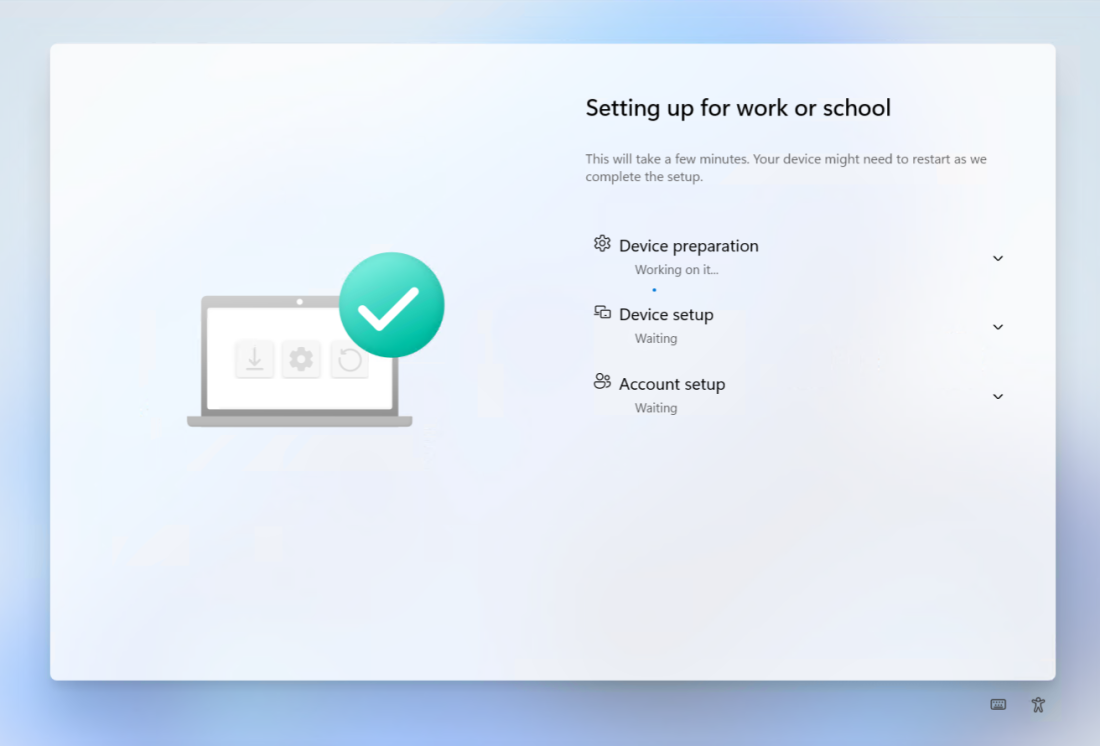
In this section we will guide you through the setup of a registered Autopilot device. Make sure your device is registered as shown in step 2. Now go ahead and reset Windows in the Settings or clean install it with an USB stick. It doesn’t really matter on how you do it. When the Windows device is turned on for the first time after new installation, the end-user experience with Windows Autopilot is as follows:
- Identify the language and region
- Select the keyboard layout and decide on the option for a second keyboard layout
- Connect to the internet: if connecting through Wi-Fi, the user will be prompted to connect to a wireless network. If the device is connected through an ethernet cable, Windows will skip this step
- Apply updates: the device will look for and apply required updates
- Windows will detect if the device has an Autopilot profile assigned to it. If so, it will proceed with the customized OOBE experience. If the Autopilot profile specifies a naming convention for the device, the device will be renamed, and a reboot will occur
- The user authenticates to Microsoft Entra ID, using the school account
- The device joins Microsoft Entra ID, enrolls in Intune and all the settings and applications are configured
Conclusion
Windows Autopilot is a powerful and convenient solution that simplifies the device deployment and management process for IT administrators and end users. By using Windows Autopilot, you can leverage the preinstalled Windows 10 version on the device and customize the OOBE according to your needs and preferences. You can also use Microsoft Intune to apply device-specific settings and policies and monitor the device status and health.
I hope this blog post has helped you understand the basics of Windows Autopilot and how to set up and configure it in Microsoft Intune. If you have any questions or feedback, please feel free to leave a comment below. Thank you for reading!


great publish, very informative. I’m wondering why the opposite specialists of this sector don’t
notice this. You should proceed your writing. I am confident, you
have a great readers’ base already!
convert all targeted devices to Autopilot which scenarios will be used and autpoloit profile will be deploy to all SCCM maanged hybrid devices