
As organizations increasingly adopt remote and hybrid work models, managing endpoint devices has become a top priority for IT administrators. Microsoft Intune is a cloud-based solution that allows administrators to manage devices and applications, including the deployment of default apps on Windows. In this blog post, we’ll explore how Intune can simplify the deployment process and help ensure that users have the necessary apps to be productive on their devices. We’ll also cover some best practices for deploying default apps with Intune to ensure a seamless experience for end-users. So, let’s dive in and learn how Intune can help streamline app deployment on Windows devices.
Table of Contents
What are we going to set up?
In the first step, we will export a XML file from a reference computer. We then have a complete copy of the settings which we can change when needed. In the second step, we will upload this file to Intune and configure the parameters. This allows us to achieve a smooth installation on the clients.

Export XML File
To set up default apps via Intune, follow these steps: configure settings on a reference computer, export them to XML, encode to Base64, use in Intune to create a custom profile. Demo uses 2 computers: reference for settings and target for testing.
- Set up the default app configuration on your reference computer

We will now take an image. To do this, follow these steps.
- Open Powershell as an administrator
- Run the following command
Dism /Online /Export-DefaultAppAssociations:"<pathname/filename.xml>"
Change the <pathname/filename.xml> to your desired location (eg. C:\temp\exportdefaultapps.xml).
- Open your XML file and copy the contents
- Go to the following website: https://www.base64decode.org/
- Paste the copied xml text in the Encoder
- Check if UTF-8 is selected
- Click on “Encode”

Now Safe the encoded text. We need it in Step 2.
Example
PD94bWwgdmVyc2lvbj0iMS4wIiBlbmNvZGluZz0iVVRGLTgiPz4NCjxEZWZhdWx0QXNzb2NpYXRpb25zPg0KICA8QXNzb2NpYXRpb24gSWRlbnRpZmllcj0iLmh0bSIgUHJvZ0lkPSJDaHJvbWVIVE1MIiBBcHBsaWNhdGlvbk5hbWU9Ikdvb2dsZSBDaHJvbWUiIC8+DQogIDxBc3NvY2lhdGlvbiBJZGVudGlmaWVyPSIuaHRtbCIgUHJvZ0lkPSJDaHJvbWVIVE1MIiBBcHBsaWNhdGlvbk5hbWU9Ikdvb2dsZSBDaHJvbWUiIC8+DQogIDxBc3NvY2lhdGlvbiBJZGVudGlmaWVyPSJodHRwIiBQcm9nSWQ9IkNocm9tZUhUTUwiIEFwcGxpY2F0aW9uTmFtZT0iR29vZ2xlIENocm9tZSIgLz4NCiAgPEFzc29jaWF0aW9uIElkZW50aWZpZXI9Imh0dHBzIiBQcm9nSWQ9IkNocm9tZUhUTUwiIEFwcGxpY2F0aW9uTmFtZT0iR29vZ2xlIENocm9tZSIgLz4NCiAgPEFzc29jaWF0aW9uIElkZW50aWZpZXI9Im1haWx0byIgUHJvZ0lkPSJPdXRsb29rLlVSTC5tYWlsdG8uMTUiIEFwcGxpY2F0aW9uTmFtZT0iT3V0bG9vayIgLz4NCjwvRGVmYXVsdEFzc29jaWF0aW9ucz4=
This will make
- Chrome to default Browser
- Outlook to default Mail-App

Import and deploy with Intune
- Go to endpoint.microsoft.com
- Click on “Devices”
- Click on “Windows”
- Click on “Configuration profiles”
- Click on “Create profile”
- Choos “Windows 10 and later” as the Platform
- And “Templates” as Profile type
- Chose “Custom” and click on “Create”

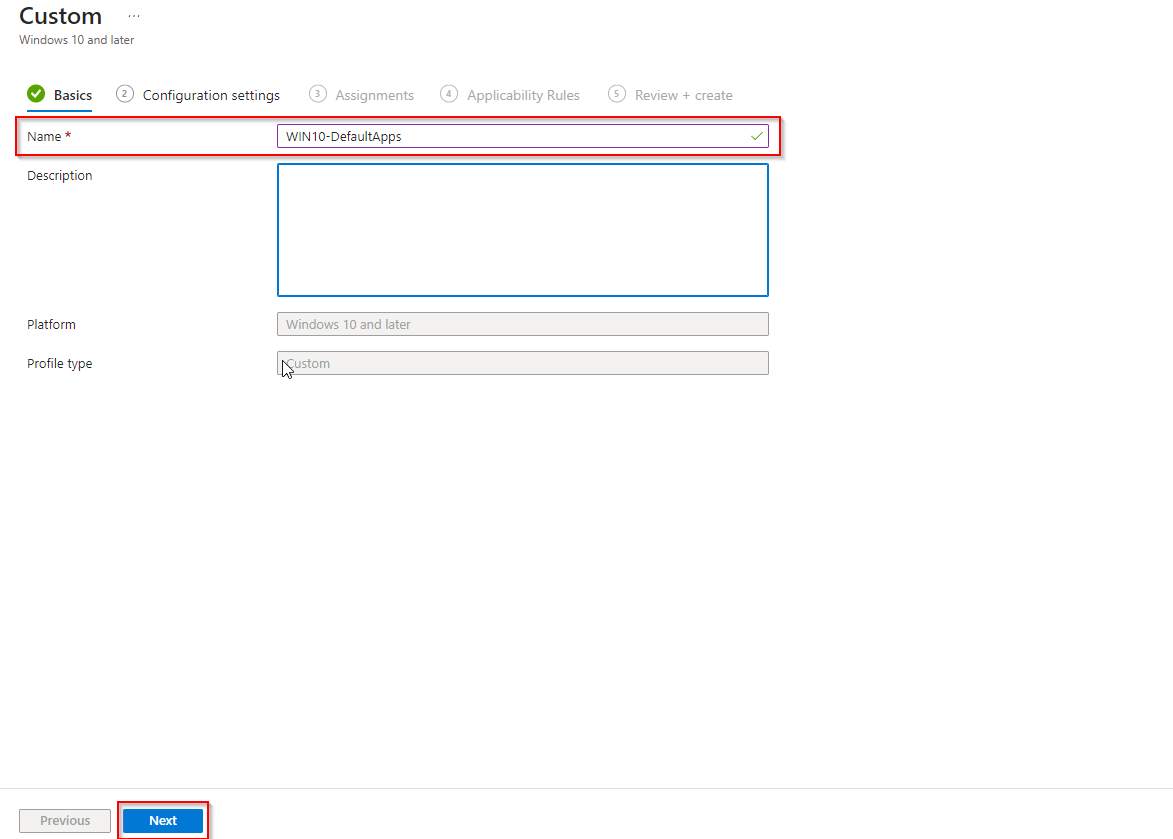
- Give it a meaningful name, such as “WIN-DefaultApps”. Click Next.
- Click on “Add”
- Enter the following:
Name: For example: DefaultApps
Description: [optional]
OMA-URI: ./Vendor/MSFT/Policy/Config/ApplicationDefaults/DefaultAssociationsConfiguration
Data Type: String
Value: Copy encoded text (from Step 2)
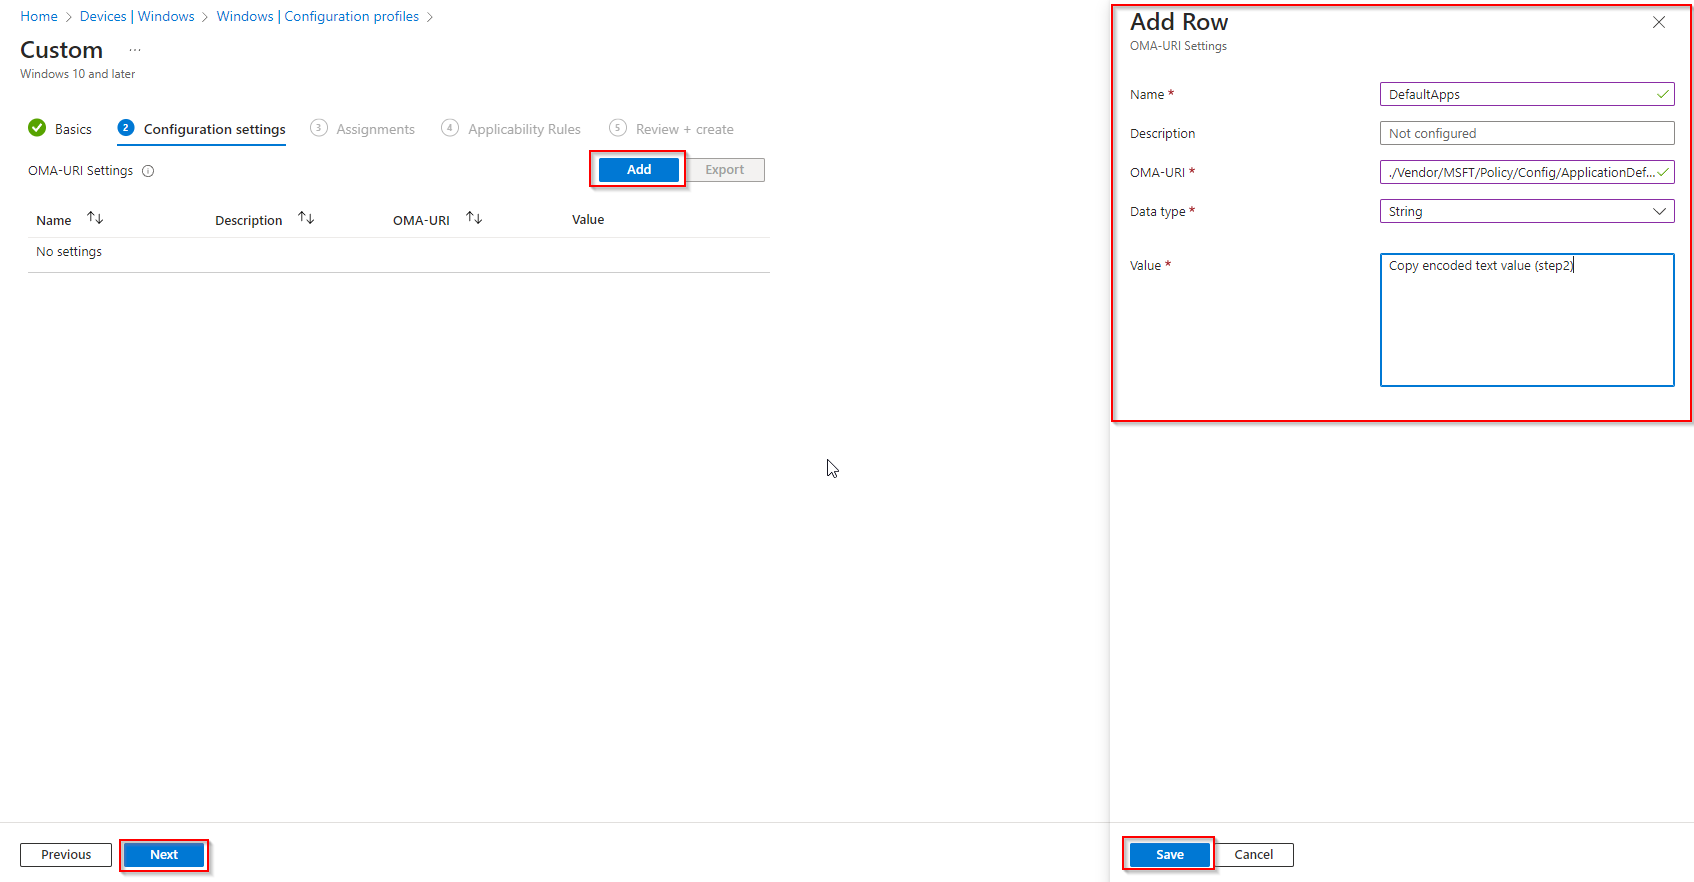
- A new entry has been created. Click on “Next”

- Assign the policy to a Group or All users. In this case i included all users.

- You can skip the “Applicability Rules”
- On the “Review + create” page, click on “Create”
Congratulations! You have successfully deployed the policy.


