Welcome to our new blog post about How to convert Microsoft 365 Shared Mailbox to Regular Mailbox. Microsoft 365 shared mailboxes are a great way for teams to manage emails sent to a common address without needing individual user licenses. However, there are times when you may need to convert a shared mailbox into a regular user mailbox—perhaps due to organizational changes, access requirements, or compliance needs. In this guide, we’ll walk you through the steps to convert a shared mailbox to a regular mailbox in Microsoft 365.
Table of Contents
What is a shared Mailbox?
A shared mailbox is a type of mailbox that multiple users can access to send and receive emails from a common email address (e.g., support@yourcompany.com). It allows teams to collaborate seamlessly without needing separate credentials. Shared mailboxes help streamline communication by centralizing email management, ensuring that important messages are accessible to all relevant team members. Additionally, unlike a regular mailbox, a shared mailbox does not require a Microsoft 365 license, provided its storage remains under 50GB and is not assigned to an individual user.
How to convert Microsoft 365 Shared Mailbox to Regular Mailbox
Option 1: Convert Account on the Admin Portal
In this section we will show you, How to convert Microsoft 365 Regular Mailbox to Shared Mailbox with the help of the Admin Portal. Just follow the steps.
- Go to https://admin.cloud.microsoft/exchange#/ and login with you admin credentials
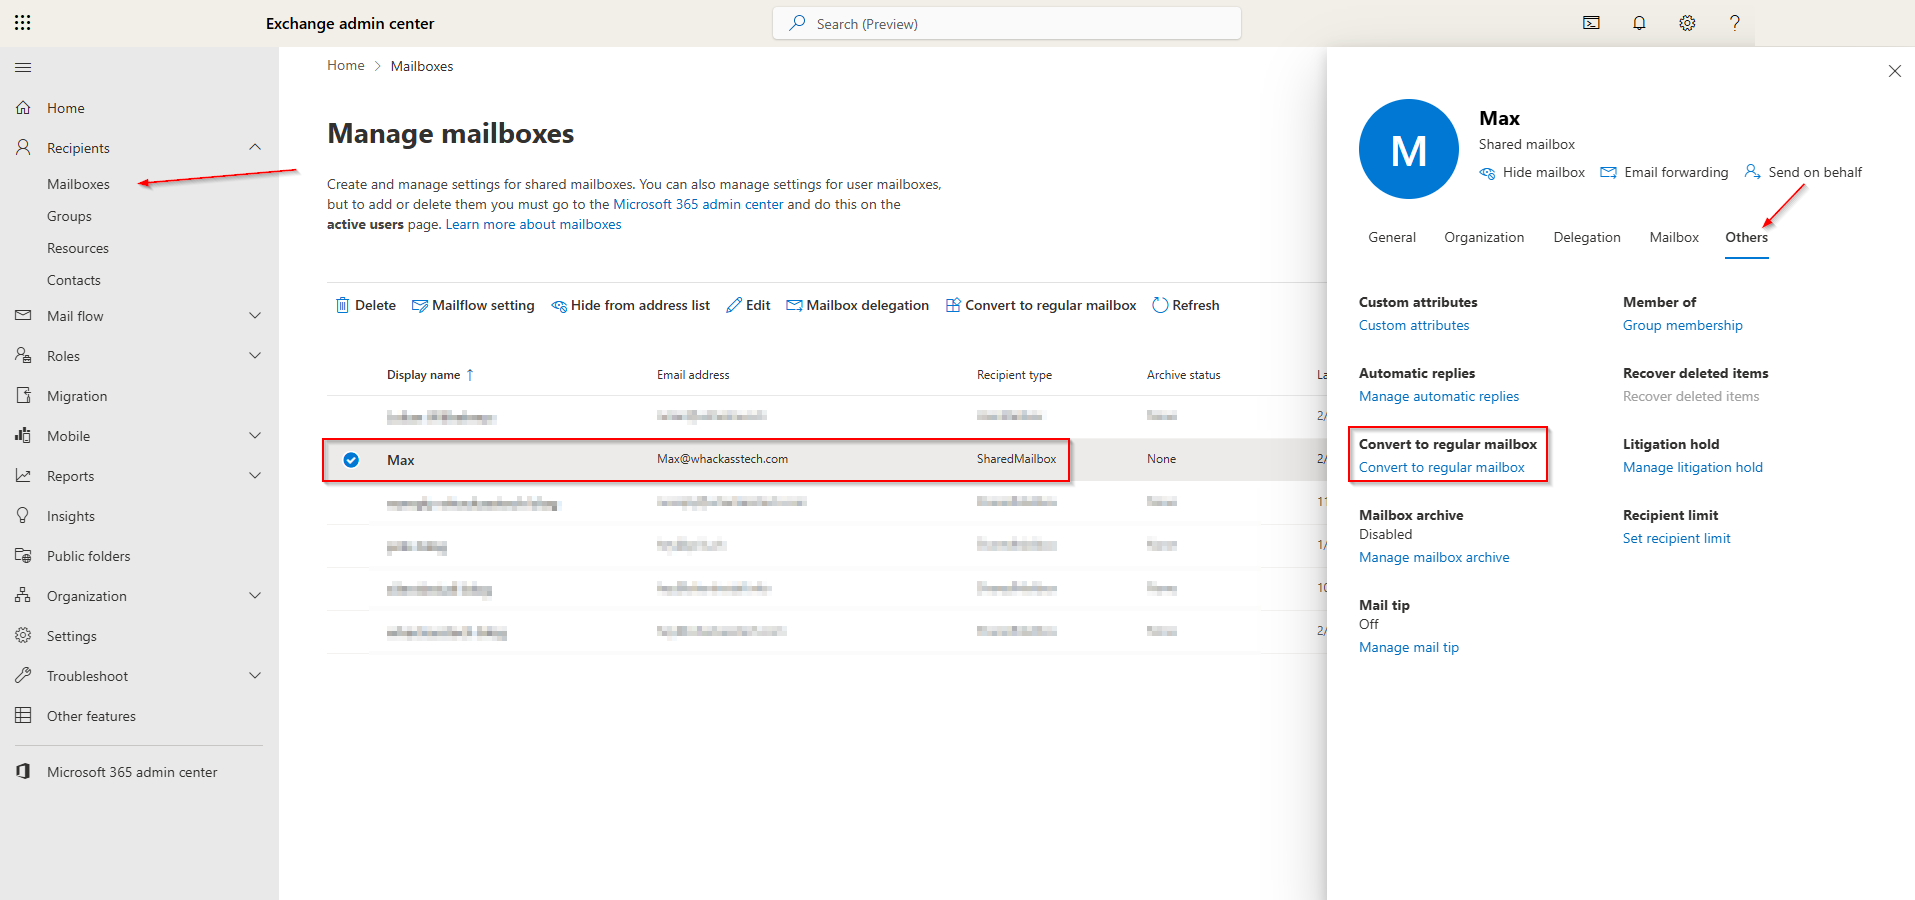
- Navigate to Recipients and Mailboxes
- Find the Shared Mailbox
- In the user’s settings page, navigate to Others
- Click on Convert to regular mailbox
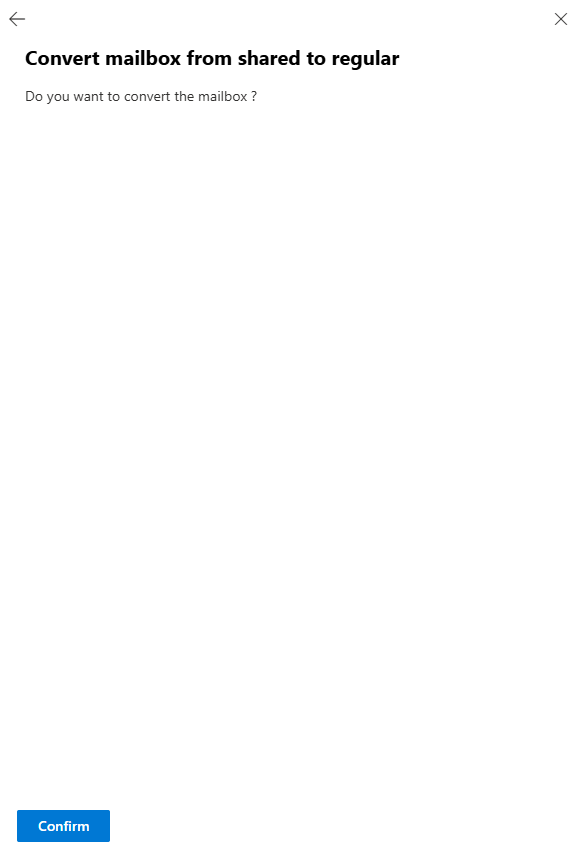
- Confirm your action
Step 2: Convert Account with PowerShell
In this section we will show you, How to convert Microsoft 365 Regular Mailbox to Shared Mailbox with the help of PowerShell. We will use the ExchangeOnlineManagement module. First we will need to install it. If you encounter problems login in, try use the PowerShell 7 or higher version. This should solve your issue.
- Open PowerShell as an administrator
Run the following command to Install the Module. Accept with Yes to All.
Install-Module ExchangeOnlineManagement
Next we will Import the Module.
Import-Module ExchangeOnlineManagement
Now we will connect to the ExchangeOnlineManagement module. Make sure you have you Microsoft 365 administrator ready. We will need this to authenticate.
Connect-ExchangeOnline -Device
You will now need to open the website shown. There you will need to enter the shown code to the field.
- Open a Browser
- Go to https://microsoft.com/devicelogin
- Enter the code which is shown in the PowerShell command
- Login with your administrator and allow the Rest API
After you have logged in with your administrator, you will see in your PowerShell command that the login was successfully.
It should look something like this.
Now, to convert the Regular Mailbox to a Shared Mailbox, you just have to run the following command.
Set-Mailbox -Identity user@yourdomain.com -Type Regular
Change the Identity to the UPN of your account you want to convert.
Conclusion
In this blog post we How to convert Microsoft 365 Shared Mailbox to Regular Mailbox. First, we had a look how we can convert a Shared Mailbox to a Regular Mailbox within the Admin Portal. In the second step, we checked the PowerShell command how we can do the same withing the ExchangeOnline module. We hope this guide has provided you with valuable insights to improve your device management strategy. Did you enjoy this article? Dont forget to follow us and share this article. If you have any questions or need further assistance, feel free to reach out or leave a comment below.

