How to deploy Shortcuts to the public desktop with Microsoft Intune. While one might assume that deploying shortcuts to the public desktop via Intune would be straightforward, unfortunately, that’s not the case. Although there are various approaches to achieve this, the most common method I encounter involves deploying a script through Intune. However, for a more robust solution (in my opinion), consider utilizing a Win32 app.
Table of Contents
What are we going to set up?
In this blog post we will show you, How to deploy Shortcuts to the public desktop with Microsoft Intune. We will use the option with a PowerShell script compressted to a Win32 application. Just note the steps below:
- Step 1: Prepare Shortcut for deployment
- Step 2: Create Win32 application
- Step 3: Import and deploy with Microsoft Intune
Step 1: Prepare Shortcut for deployment
In this section we will start by preparing the Shortcut for deployment. Just follow the steps below.
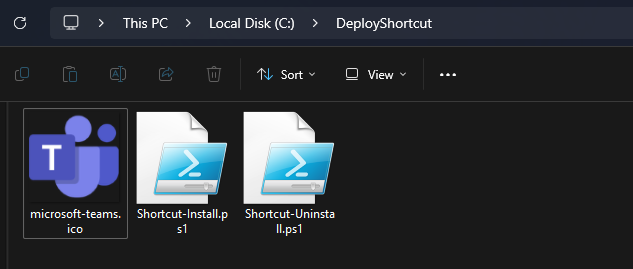
- Create a new folder DeployShortcut on C:. Copy an Icon for your Shortcut. You can download an Icon online for example on https://icon-icons.com or convert one https://icoconvert.com/ from a picture. Just make sure to copy a .ico to the DeployShortcut folder.
- Create a new folder Output on C:.


Now we are going to create two PowerShell scripts. This will make sure, that the Shortcut is created. Just follow the steps bellow:
- Copy the following PowerShell script and name it Shortcut-Install.ps1
- Dont forget to edit the red sections.
#Create directory to hold icon file and copy file there
New-Item -Path "c:\" -Name "DeployShortcut" -ItemType "directory" -Force
Copy-Item ".\microsoft-teams.ico" -Destination "c:\DeployShortcut\microsoft-teams.ico"

#Shortcut creation and specify settings
$Shell = New-Object -ComObject ("WScript.Shell")
$ShortCut = $Shell.CreateShortcut("C:\users\public\desktop\MicrosoftTeams.lnk")
$ShortCut.TargetPath="C:\Program Files\Google\Chrome\Application\chrome.exe"
$Shortcut.Arguments="https://teams.microsoft.com/"
$ShortCut.IconLocation = "C:\DeployShortcut\microsoft-teams.ico";
$ShortCut.Description = "Shortcut to Microsoft Teams Web";
$ShortCut.Save()

- 1: Change to your Icon name which you have copied to the DeployShortcut folder.
- 2: Change to your Icon name which you have copied to the DeployShortcut folder.
- 3: Change to your Name you want to be displayed for the User.
- 4: Enter the URL where the link should take you. This can be a Webaddress or a URL to a local application.
- 5: Change to your Icon name which you have copied to the DeployShortcut folder.
- 6: Change to a description for your Shortcut.
When you have set all the parameters in your PowerShell script save this script in the same folder DeployShortcut.
We need also to create a second PowerShell script for Uninstallation. Just follow the steps:
- Copy the following PowerShell script and name it Shortcut-Uninstall.ps1.
- Change the MicrosoftTeams.lnk with the same Name given in the Install script. In my case this is MicrosoftTeams.lnk.
- Save this PowerShell script in the same folder DeployShortcut.
Remove-Item -Path "c:\users\public\desktop\MicrosoftTeams.lnk" -Force
Concrats, you are all set for the next step. Your DeployShortcut folder should look something like this.
Step 2: Create Win32 application
Now we are going to create an Intune Win file with the official application. First of all download the official Microsoft Intune Win App Tool.
- Download the official Microsoft Intune Win App Tool
- After installation open the Intune Win App Tool. Important: You need to open the Tool with Administrator right. Otherwise there will be an error.
In the application specify the following things:
- Please specify the source folder: C:\DeployShortcut
- Please specify the setup file: Shortcut-Install.ps1
- Please specify the output folder: C:\Output
- Do you want to specify catalog folder: N

In your Output Folder, there should be a new file called Shortcut-Install.intunewin.

Step 3: Import and deploy with Microsoft Intune
After we have created the intunewin file with the Shortcut Install inside, we can now upload the Win32 application to Microsoft Intune and deploy it to our environment. Just follow these steps.
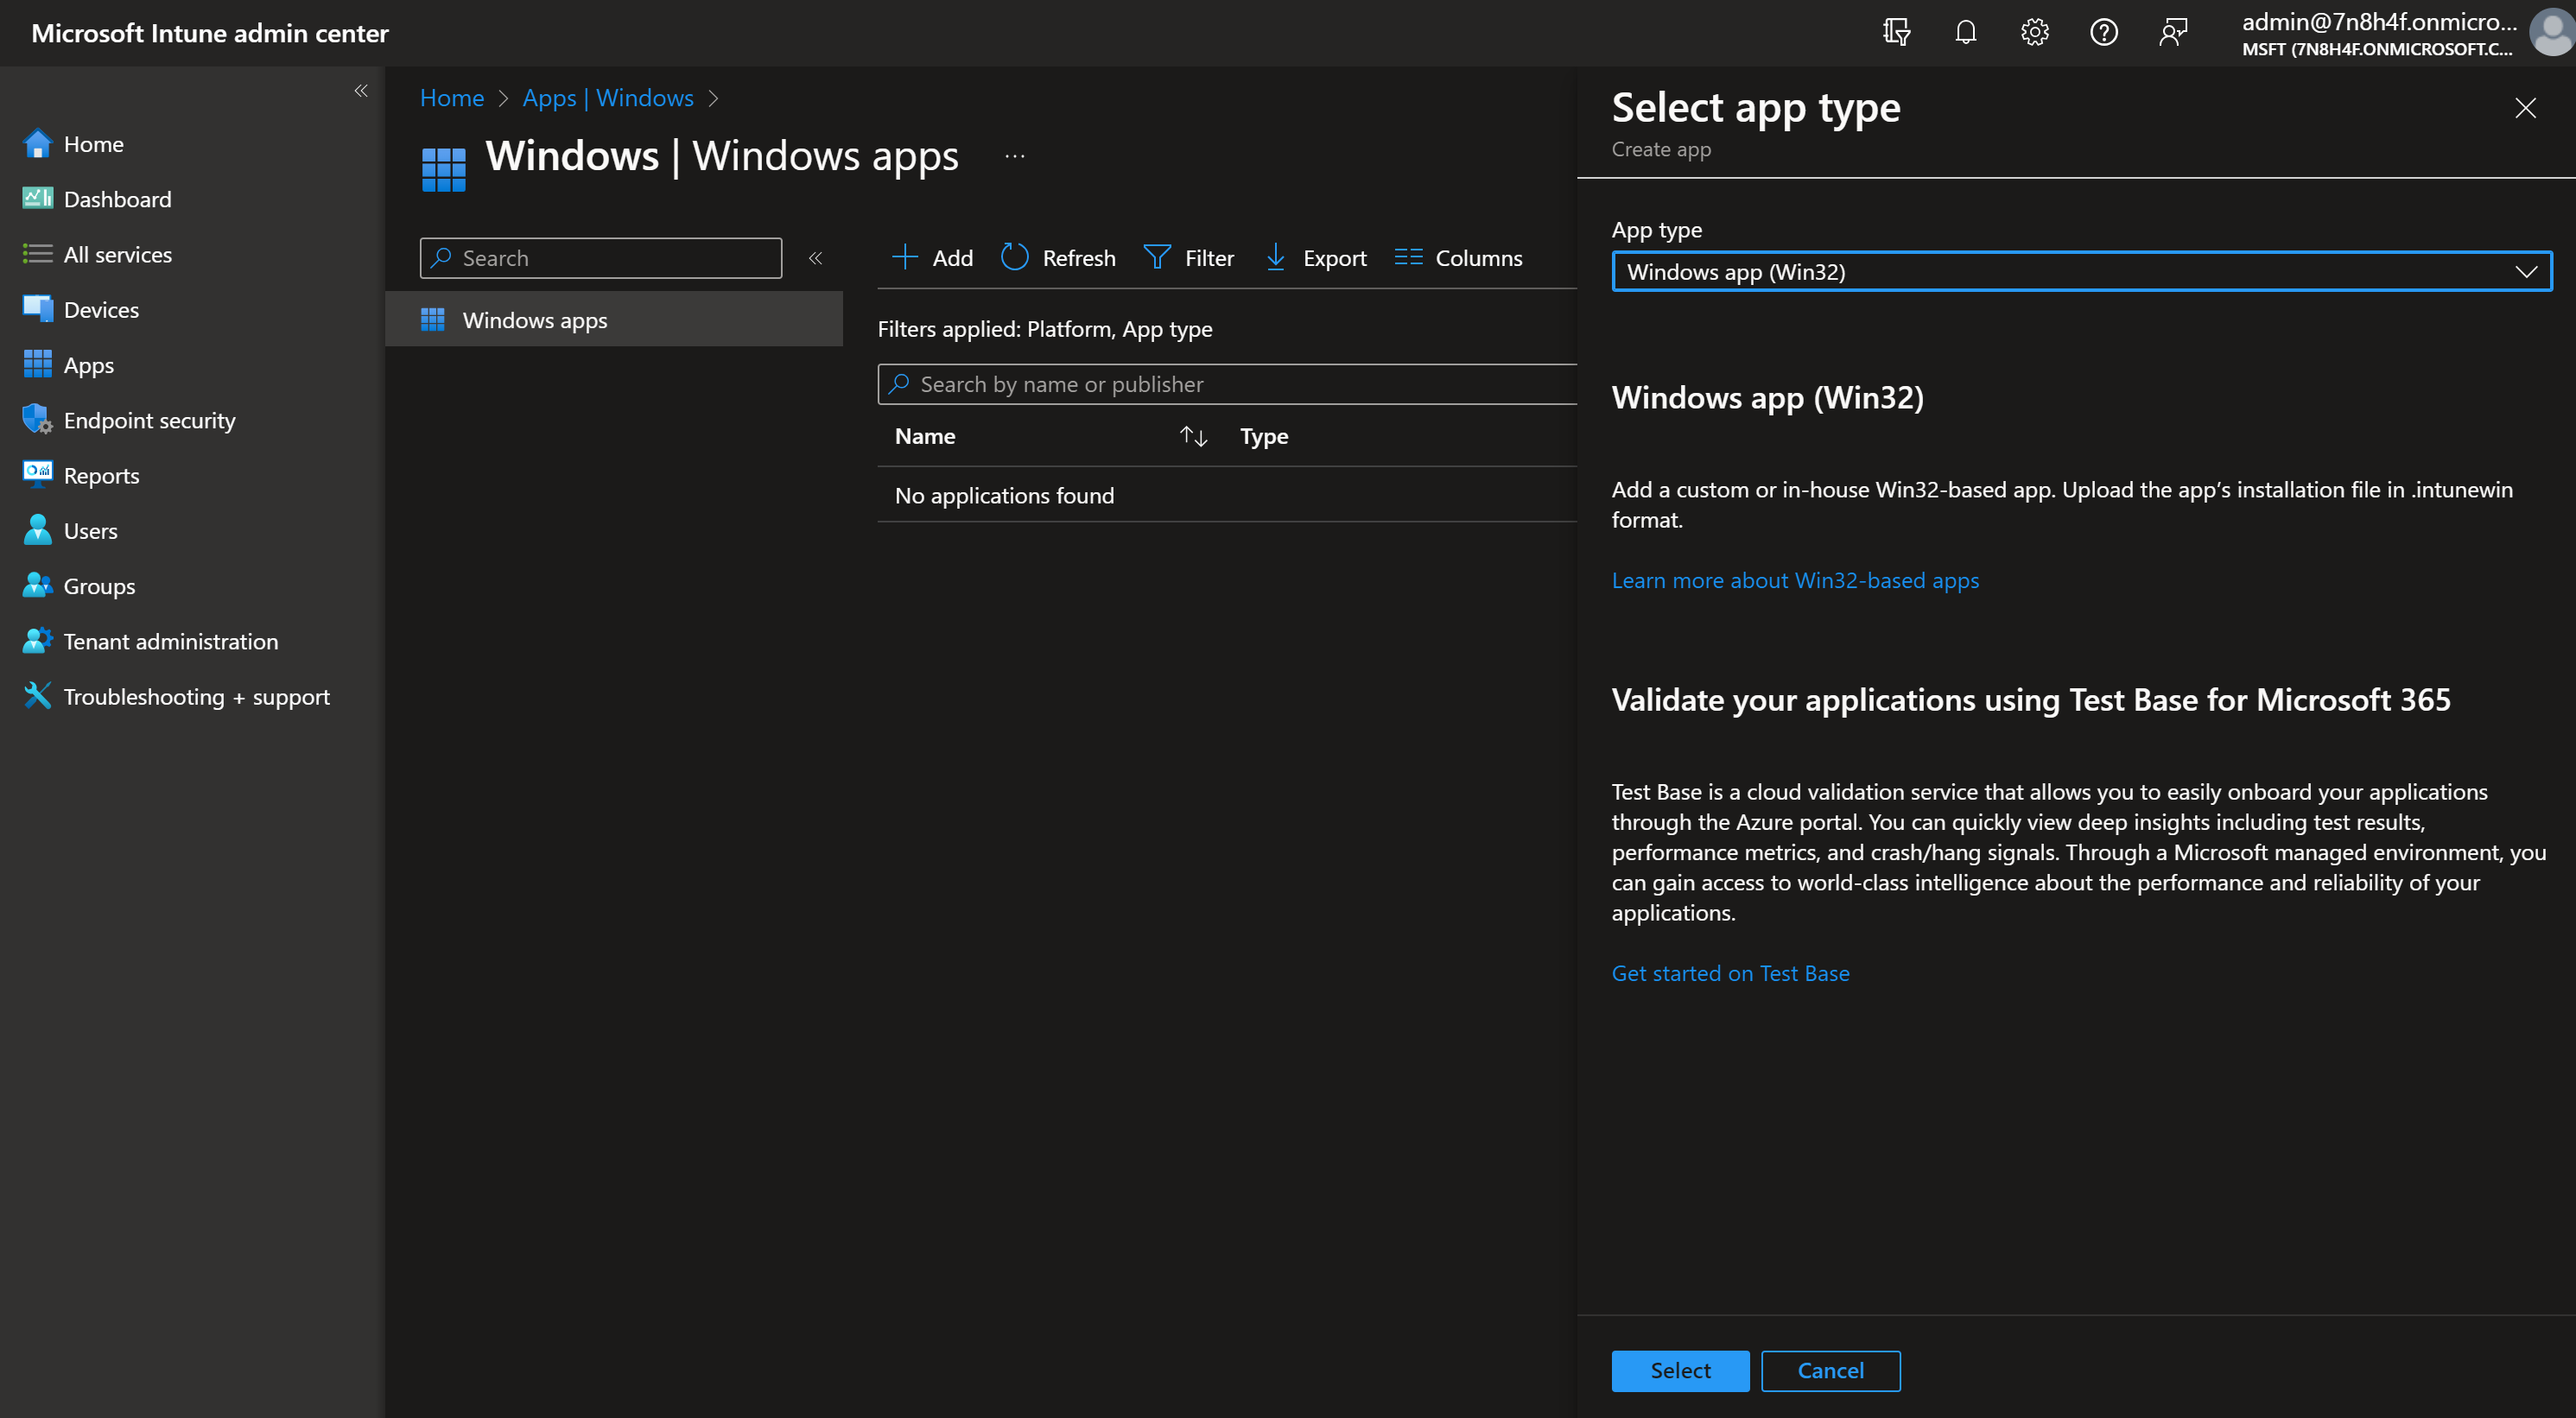
- Go to intune.microsoft.com
- Click on Apps
- Click on Windows
- Click on Add
- Chose App type Windows app (win32)
- Click on Select
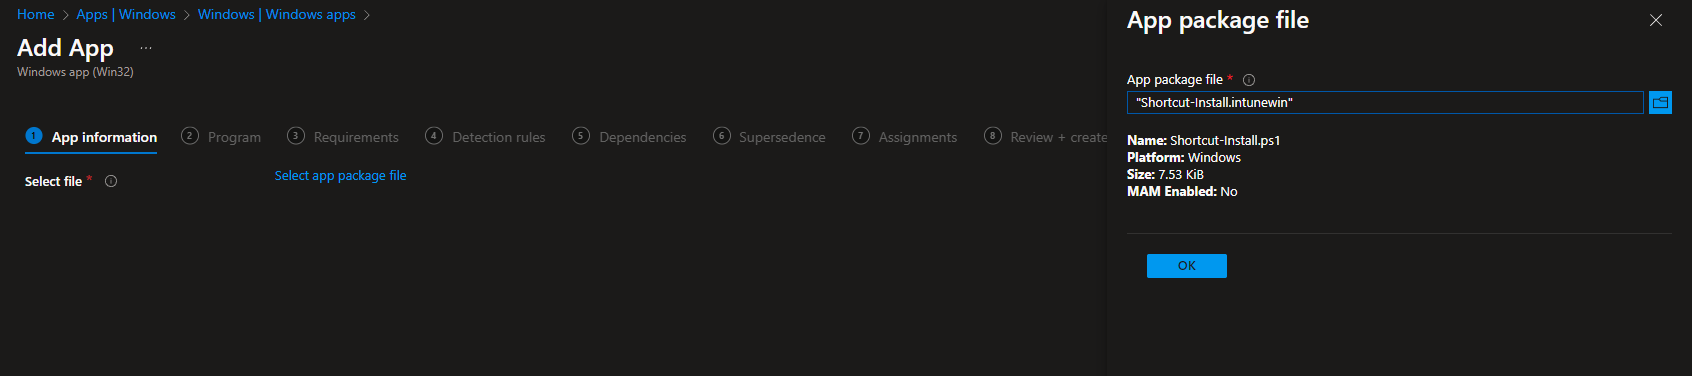
- Click on Select app package file
- Upload your IntuneWin file which is located in C:\Output
- Click on OK
- Click on Next
- Here you can change the Settings. I leave it as it is. Dont forget to enter a Publisher
- Click on Next

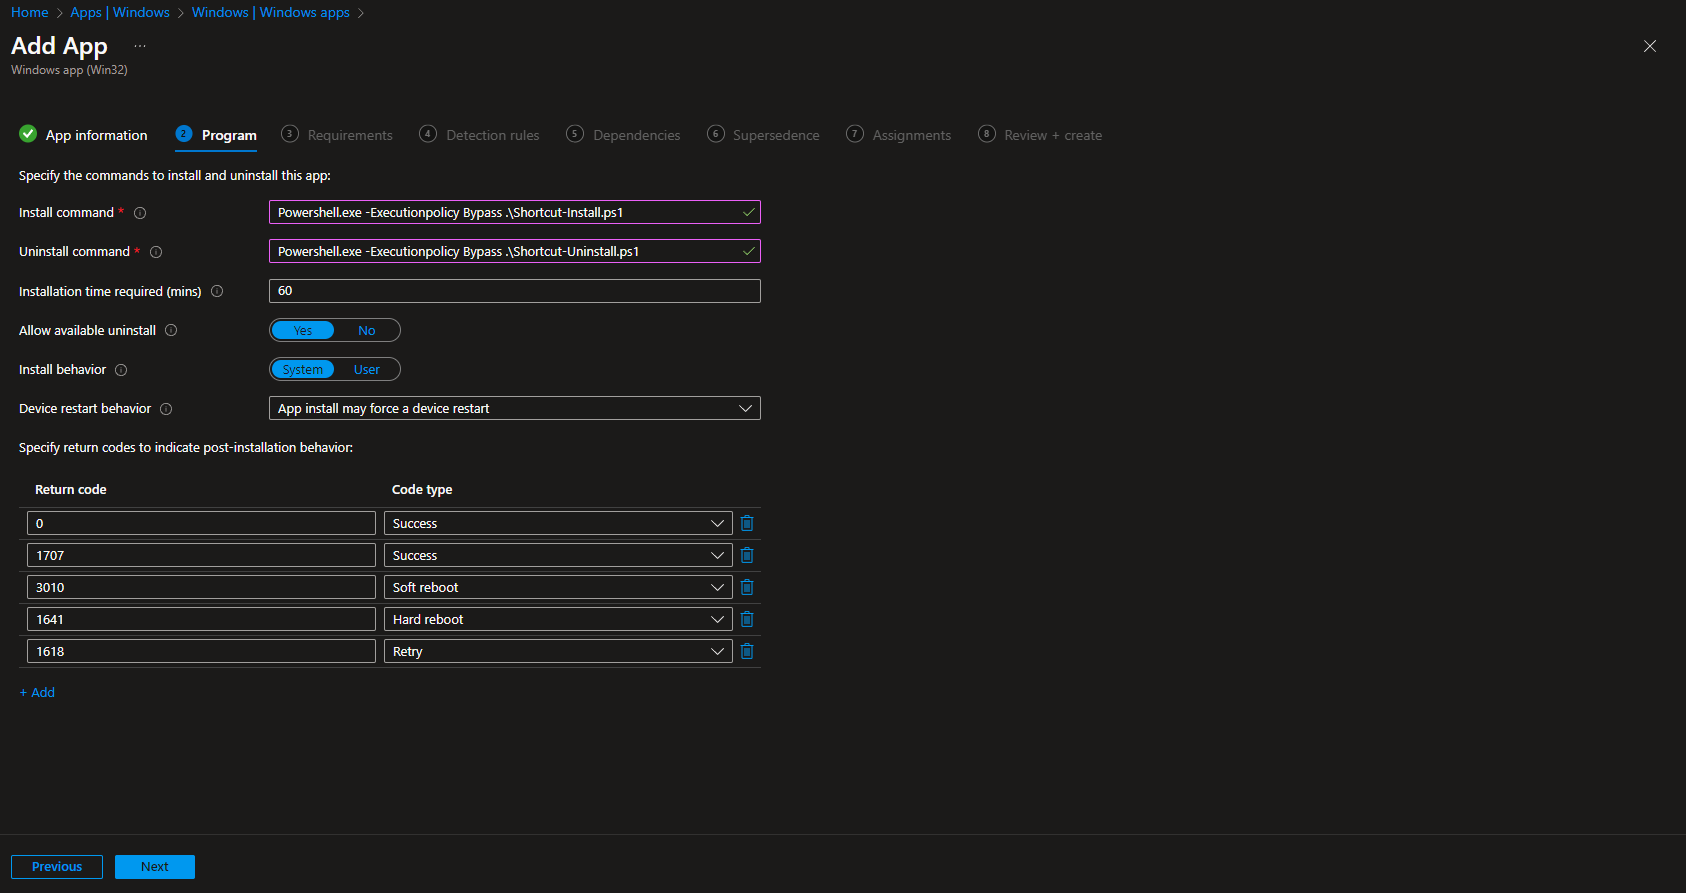
On the Program tab enter the following Commands:
- Install Command: Powershell.exe -Executionpolicy Bypass .\Shortcut-Install.ps1
- Uninstall command: Powershell.exe -Executionpolicy Bypass .\Shortcut-Uninstall.ps1
- Allow available uninstall: Yes
- Install behavior: System
- Click on Next
On the Requirements tab enter:
- Operating system architecture: 64-bit / 32-bit
- Minimum operating system: Windows 10 1607
- Click on Next
On the Detection rules tab enter the following:
- Rules format: Manually configure detection rules
- Click on Add
- Rule type: File
- Path: C:\users\public\desktop\
- File or Folder: [Enter here your Link name] For me this is MicrosoftTeams.lnk
- Detection method: File or folder exists
- Associated with a 32-bit app on 64-bit clients: No
- Click on Ok and on Next

- Define your Dependencies if applicable and click on Next
- Define your Supersedence if applicable and click on Next
- On the Assignments tab assign the Policy to a Group or to All User
- Click on Next
- And Review + Create the Policy
Congratulations! You have successfully deployed the Shortcut.
Conclusion
You learned How to deploy Shortcuts to the public desktop with Microsoft Intune. We have first created a Win32 file with the Icon, Install and Uninstall script. Last but not least we have uploaded the application to Intune and configured different settings.
Did you enjoy this article? Dont forget to follow us and share this article. You may also like the the following articles.


Hello Max, Thank you for this post, I have used your article to deploy a Costume website shortcut with Intune. The shortcut was successfully deployed with Intune, but the .ico file is still not showing up on the test computer. The shortcut on the desktop is blank. Do you have any suggestions?
Hi Diana
Maybe the icon path is not quite right. If you still need some assistant, just send me some screenshots on hey@whackasstech.com.
The uninstall script is unclear
“Change the MicrosoftTeams.lnk with the same Name given in the Install script. In my case this is MicrosoftTeams.lnk.”
Why are we changing the MicrosoftTeams.Ink just to type in MicrosoftTeams.Ink again?
where do i put this command?
Remove-Item -Path “c:\users\public\desktop\MicrosoftTeams.lnk” -Force
I don’t get this?
Hi Ronald
For the MicrosoftTeams.lnk. This is just the icon for the shortcut. You can change this only if you want a different icon. But if you want to use the Teams icon for your shortcut, you dont need to change anything.
The uninstall command is just removing the shortcut from the desktop in case of an uninstall.
Kind regards
Max
When you place the ico file in the folder where the script is Copy-Item “.\xxx.ico” it says it cant find it.
Does it copy the file with in the intune package after?