Welcome to our new blog post about How to use the set-inform command on UniFi devices. Managing UniFi devices can be seamless when everything connects automatically to your UniFi Controller. But in real-world scenarios—like adopting a used access point, moving devices between sites, or dealing with cloud-hosted controllers—you might need to manually point a device to your controller. This is where the set-inform command comes in. It’s a simple but essential tool that tells your UniFi device where to “phone home.” In this guide, we’ll walk you through when to use set-inform, how to prepare, and how to execute the command step-by-step.
Table of Contents
Why Do I Need Set-Inform
The set-inform command is used to manually tell a UniFi device which controller to connect to. This is most often needed when:
- You’re adopting a device that was previously managed by another controller.
- Your controller is hosted in the cloud or on a different local subnet.
- Automatic discovery isn’t working due to firewall rules or network isolation.
- You’re migrating to a new UniFi Controller and need devices to register with it.
Without setting the inform URL, the device may sit in a “pending” state or fail to show up entirely in your controller.
How to use the set-inform command on UniFi devices
Step 1: Get Cloud Key and Device IP
Before you can run the set-inform command, you’ll need two key pieces of information:
-
Controller (Cloud Key) IP or Hostname:
This is the address your UniFi Controller is reachable at. If you’re using a cloud-hosted instance (e.g., on UniFi Hosted, this might be a public IP or DNS name. If you have an UniFi Hosted infrastructure, you can copy the URL for Set-Inform on the Portal. Make sure port 8080 is open for device adoption. -
Device IP Address:
You can usually find this from your DHCP server or by scanning your network using tools like Advanced IP Scanner, nmap, or by checking your router’s client list.
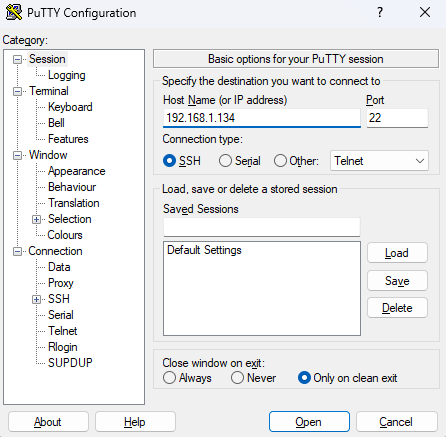
Step 2: Connect to Device with PuTTY
Once you have the device’s IP address, you’ll need to SSH into it:
- Download and install PuTTY (if you don’t already have it).
- Open PuTTY and enter the IP address of the UniFi device.
- Set the port to 22 and make sure SSH is selected.
- Click Open and log in using the default UniFi credentials:
- Username: ubnt
- Password: ubnt (unless previously changed)
You should now see a command prompt for the device

Step 3: Set-Inform
With access to the device’s command line, you can now run the set-inform command:
set-inform http://<controller_ip>:8080/inform
Replace <controller_ip> with the IP address or hostname of your controller. For example:
set-inform http://192.168.1.10:8080/inform
You’ll see a message like “Inform URL set. Please adopt it in the controller.”
Next, go to your UniFi Controller interface. You should see the device appear in the “Pending Adoption” list. Click Adopt. After a few moments, return to your SSH session and run the same set-inform command again to finalize the connection.
Conclusion
In this blog post we Learn about How to use the set-inform command on UniFi devices. Using the set-inform command is a simple but powerful way to manually onboard UniFi devices to the correct controller—especially in non-standard networking setups. Whether you’re setting up a new site, migrating hardware, or working with secondhand gear, knowing how to SSH into the device and set its inform URL can save hours of troubleshooting. With this step-by-step process, you’ll be able to confidently manage your UniFi network and keep your infrastructure running smoothly. Did you enjoy this article? Dont forget to follow us and share this article. If you have any questions or need further assistance, feel free to reach out or leave a comment below.


