How to configer Universal Print connector. The Universal Print connector is a component that you can use to make a printer work with Universal Print. Unless you have a printer that directly connects to Universal Print, you must use a connector.
Table of Contents
What are we going to set up?
In this blog post we will show you, How to configure Universal Print connector. We first are going to install the connector software. In the second step we are going to register printers.
Prerequisites
- Universal Print is enabled in your Azure tenant
- Your user account has the role Printer Administrator or Global Administrator
- Your user account is assigned a Universal Print license
- Windows 10 64-bit, Pro or Enterprise, version 1809 or laterorWindows Server 2016 64-bit or later (Windows Server 2019 64-bit or later is recommended)
- .NET Framework 4.7.2 or later
- A host PC that meets the following requirements
- Running 24×7 (e.g. sleep/Hibernate are disabled).
- Always has a connection to the internet.
- Has access to the following internet endpoint
- *.print.microsoft.com
- *.microsoftonline.com
- *.azure.com
- *.msftauth.net
- go.microsoft.com
- aka.ms
Please also read this article to determine how many printers should be installed on each connector and how many connectors you need in your environment.

Install the connector software
Install the connector software
Run the Universal Print connector installer and follow the steps to install and launch the Universal Print connector application.
The connector can be installed on a computer running Windows where printers are installed to connect these printers to Universal Print. Alternatively, Microsoft partners offer different implementations of the Universal Print connector, such as appliances, that might be more suitable to your environment.
You can find the Universal Print connector installer on the Azure Universal Print Dashboard or just click on the button below.

Register your connector
If the connector application doesn’t start immediately after the installer is finished, you can start it by using the shortcut on the desktop.
- On the start screen, click the Login button and sign in using your tenant’s credentials.

- In the Connector name box, enter the name you want, and then select the Register button.

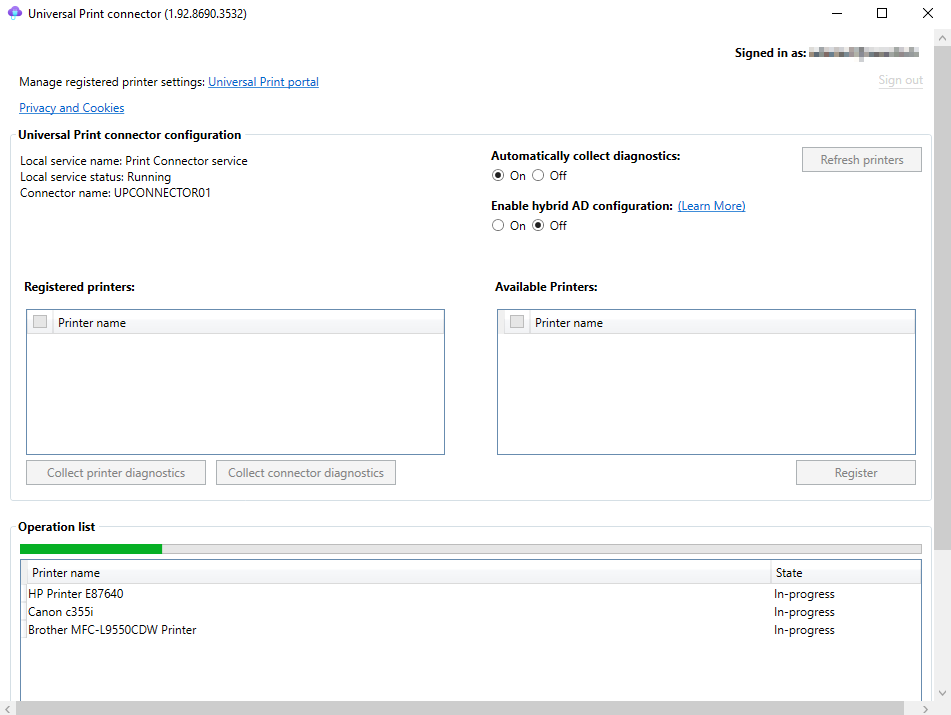
After the connector registration finishes, the app displays a list of available printers that are ready to be registered with Universal Print.

Register printers
Make sure the Printers are in the same Network or are installed on the computer/server where Universal Print connector is installed.
- Select the printers your want to register from the Available Printers list and click the Register button.

This will start the registration process which could take between 10 and 30 seconds per printer. The selected printers will move to the Operation list. You can scroll down to see the progress of the registration process there. Once the registration process successfully completes for a printer, the printer is shows up in the Registered printers list.


Conclusion
You learned how to configure Universal Print connector. We installed the application and registered it with Universal Print. In the second step we registered printers.
Did you enjoy this article? Dont forget to follow us and share this article. You may also like the the following articles.